Search This Blog

Sunday, September 4, 2011

Saving the Input Text - with Save Button

// Creates a fileReference which you will use later to save your text
var fr:FileReference = new FileReference();

// Creates a textField, sets the x,y positions and width, adds it to the stage.
// You can skip this if you have already created a textField on your stage.
var myTextBox:TextField = new TextField();
myTextBox.type = TextFieldType.INPUT;
myTextBox.background = true;
myTextBox.x = 10;
myTextBox.y = 10;
myTextBox.width = 530;
addChild(myTextBox);
myTextBox.text = "Type your text here.";

/* Add code to create a button or draw one on stage */

// Rename "score_btn1" to whatever, I'm just assuming that's what you've called your button
score_btn1.addEventListener(MouseEvent.CLICK, saveFile);

// This is the function that will take text that you type and save it to a .txt file
function saveFile(e:MouseEvent):void {
   fr.save(myTextBox.text,"NewFileName.txt");
}

Here is an example that loads in a file and traces its contents:---- from JTD FLASh from gotoAndLearn()

var btn:Sprite = new Sprite();
btn.graphics.beginFill(0);
btn.graphics.drawRect(0,0,100,20);
btn.graphics.endFill();
addChild(btn);

var fr:FileReference = new FileReference();
fr.addEventListener(Event.COMPLETE, completeHandler);
fr.addEventListener(Event.SELECT, selectHandler);

btn.addEventListener(MouseEvent.CLICK, onBtnClicked);

function onBtnClicked(ev:MouseEvent):void {
   fr.browse(); //Use arguments to restrict file types. See Lang Ref.
}

function completeHandler(ev:Event):void {
   trace(fr.data);
}

function selectHandler(ev:Event):void {
   fr.load();
}

Monday, July 25, 2011

Unzip Chinese Filenames for English Windows XP


Futakotamagawa


Unzip files from compressed ZIP archives with Chinese or Japanese file names under non-Chinese / non-Japanese Windows XP


Some might have experienced problems with unzipping ZIP archives that contain file names with double-byte Chinese or Japanese characters. I have not found any sites explaining how to preserve Chinese file names while uncompressing the files on a PC running Windows XP.

Here is a solution that I have found out by trial-and-error.

You need:
  • Microsoft AppLocale (download it from the Microsoft homepage)
  • An archiving software that uncompresses your ZIP-File (i.e. freeware 7-Zip)
  • Microsoft Windows XP (should work with Microsoft Windows 2000 too though)
In this example we use a German Windows XP Professional, German AppLocale and 7-Zip archiving software.

1. Download and install AppLocale

2. Download and install archiving software (i.e. 7-Zip)

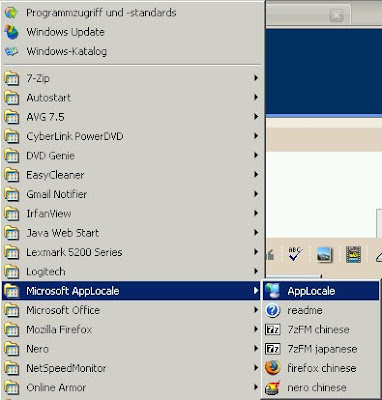
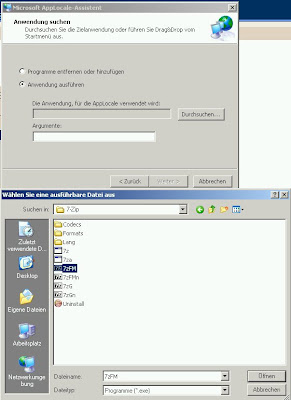
3. Start AppLocale and browse for the executable (.exe) file


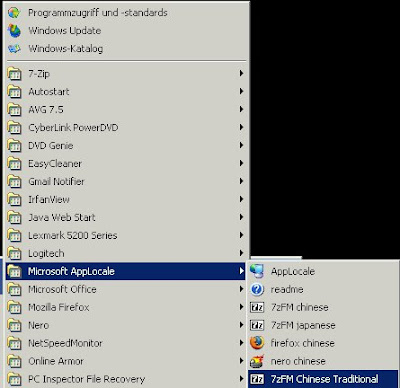
Fig. 1 Starting AppLocale from the Start menu

Fig. 2 Browse for the archive utility. In case of 7Zip it is 7zFM in C:\Program Files\7-Zip\7zFM.exe or the like

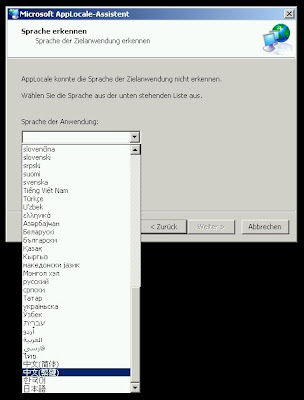
4. Choose the desired language in AppLocale


Choose Chinese or Japanese, respectively.


Fig. 3 Choose desired language (中文繁體 for Traditional Chinese, 日本語 for Japanese)

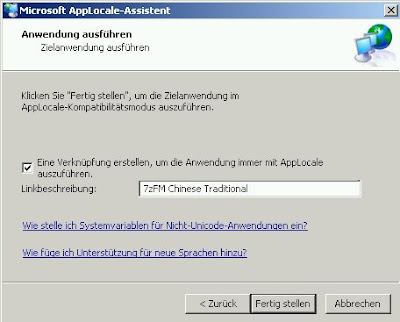
5. Creating a link


You can create a link (recommended) that you can use every time you need to handle compressed ZIP archives with Chinese or Japanese file names. Choose a good name for the link i.e. the application name and the language you set before.


Fig. 4 Adding a link to the Microsoft AppLocale start menu

The link will be placed into the Microsoft AppLocale folder and your application will start with the desired language.

6. How to start the application after the first time
Start 7-Zip from the start menu.


Fig. 5 Starting the archive application in i.e. Chinese.

Fig. 6 Viewing the files with Chinese file names in 7-Zip

You should be able to read Chinese file names inside the application too.
Attention: Do not use Drag and Drop to uncompress your files. The file names will not remain Chinese characters.
Mark the files you need to uncompress and press the "Extract" (Blue minus sign) button.
Specify your destination folder to copy the files to it.

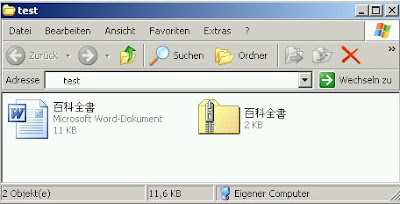
Fig. 7 Uncompressed file

Your uncompressed files with your Chinese file names should be on your hard drive now.

As for MacOS X Leopard users: Choose the Chinese language for your system and logout. Login again and start the uncompressing procedure with any archive software (Zipeg etc.)http://aeropostale.blogspot.com/2008/01/unzip-files-from-compressed-zip.html

Friday, April 22, 2011

Learning AS3

Load Movie() in AS3

var swfToLoad: String = "mySwf.swf";
var loader: Loader = new Loader();
loader.load(new URLRequest(swfToLoad));
addChild(loader);

var myLoader:Loader = new Loader();
myLoader.load(new URLRequest("load.swf"));

------------------------------------------------------------------------------------------------
Load Movie using BUTTONS and Progress BAR

import fl.controls.ProgressBar;
import fl.controls.Button;

var my_loader:Loader = new Loader();


var my_btn:Button = new Button();
my_btn.label = "Load Image";

my_btn.x = 100;
my_btn.y = 200;
addChild (my_btn);


var my_pb:ProgressBar = new ProgressBar();
my_pb.source = my_loader.contentLoaderInfo;

my_pb.x = 100;
my_pb.y = 200;


my_btn.addEventListener(MouseEvent.CLICK, startLoading);
function startLoading(e:MouseEvent):void{

my_loader.load(new URLRequest("myPhoto.jpg"));
addChild(my_pb);
removeChild(my_btn);
my_btn=null;
}


my_loader.contentLoaderInfo.addEventListener(Event.COMPLETE, finishLoading);
function finishLoading(e:Event):void{

addChild(my_loader);
removeChild(my_pb);
my_pb = null;
}


------------------------------------------------------------------------------------------------

Add mouse click event to SimpleButton

package {
  import flash.display.*;
  import flash.events.*;


  public class SimpleButtonDemo extends Sprite {
    public function SimpleButtonDemo(  ) {
      var button:SimpleButton = new SimpleButton(  );
      button.x = 20;
      button.y = 20;
      
      button.upState = createCircle( 0x00FF00, 15 );
      button.overState = createCircle( 0xFFFFFF, 16 );
      button.downState = createCircle( 0xCCCCCC, 15 );


      button.hitTestState = createCircle( 0x000000, 50 );
      
      button.addEventListener( MouseEvent.CLICK, handleClick );
      
      addChild( button );  
    }
    
    private function createCircle( color:uint, radius:Number ):Shape {
      var circle:Shape = new Shape(  );
      circle.graphics.lineStyle( 1, 0x000000 );
      circle.graphics.beginFill( color );
      circle.graphics.drawCircle( 0, 0, radius );
      circle.graphics.endFill(  );
      return circle;
    }
    
    private function handleClick( event:MouseEvent ):void {
      trace( "Mouse clicked on the button" );  
    }
  }
}


--------------------------------------------------------------------
 Load and Save in AS3
 var buttonShape:Shape = new Shape();
buttonShape.graphics.beginFill(0x336699);
buttonShape.graphics.drawCircle(50, 50, 25);
var button = new SimpleButton(buttonShape,
 buttonShape, buttonShape, buttonShape);
addChild(button);


var fileRef:FileReference= new FileReference();
button.addEventListener(MouseEvent.CLICK, onButtonClick);


function onButtonClick(e:MouseEvent):void {
fileRef.browse([new FileFilter("Text", "*.jpg;*.gif;*.png")]);
fileRef.addEventListener(Event.SELECT, onFileSelected);
}


function onFileSelected(e:Event):void {
fileRef.addEventListener(Event.COMPLETE, onFileLoaded);
fileRef.load();
}


function onFileLoaded(e:Event):void {
var loader:Loader = new Loader();
loader.loadBytes(e.target.data);
addChild(loader);
}


var MyTextField:TextField = new TextField();
var MyButtonField:TextField = new TextField();
var MyFile:FileReference = new FileReference();


MyTextField.border = true;
MyTextField.type = TextFieldType.INPUT;
MyTextField.y=100


MyButtonField.background = true;
MyButtonField.backgroundColor = 0x339933;
MyButtonField.x = 150;
MyButtonField.height = 20;
MyButtonField.text = "Click here to save";


addChild(MyTextField);
addChild(MyButtonField);
MyButtonField.addEventListener(MouseEvent.CLICK, clickhandler);


function clickhandler(e:MouseEvent): void {
    MyFile.save(MyTextField.text);
}
 ------------------------------------------------------------------

Switch Case for Buttons


but1.addEventListener(MouseEvent.CLICK, clickHandler);
but2.addEventListener(MouseEvent.CLICK, clickHandler);
but3.addEventListener(MouseEvent.CLICK, clickHandler);


function clickHandler(event:MouseEvent):void
{


switch (event.currentTarget.name)
{
case "but1" :
trace("you chose a red Papa Smurf");
break;
case "but2" :
trace("you chose a green Papa Smurf");
break;
case "but3" :
trace("you chose a blue Papa Smurf");
break;


}
}

Wednesday, January 12, 2011

How to Track Visitors to a Blogger Blog Using Google Analytics

If you want to track visitors to your Blogger blog, you can use the free tool offered by Google Analytics. You can even sign up using the Google Blogger account name and password you use to access your Blogger account.
Difficulty: Moderately Easy

Instructions

Things You'll Need:

  • Internet access
  • Blogger account
  1. 1
    Go to Google Analytics (see Resources below).
  2. 2
    Log in with your Google Blogger account name and password.
  3. 3
    Click on "Sign Up for Google Analytics."
  4. 4
    Enter your Blogger URL and blog name when prompted.
  5. 5
    Enter your name and phone number.
  6. 6
    Copy the code that's generated. You will paste this code into your blog template.
  7. 7
    Log in to your Blogger account and click on "Template."
  8. 8
    Click on "Add a Page Element."
  9. 9
    Select the "Add to Blog" button under "HTML/JavaScript" on the New Page Element window.
  10. 10
    Paste the code you copied into the content block and select "Save Changes."
  11. 11
    Go back to your Google Analytics page and click to test whether you've properly installed the code.
  12. 12
    Track the number of visitors to your blog, as well as other visit statistics, by clicking "View Reports" on the Google Analytics menu bar.

Read more: How to Track Visitors to a Blogger Blog Using Google Analytics | eHow.com http://www.ehow.com/how_2019724_google-analytics-blogger.html#ixzz1Atgo1HNj